Kawasaki Ninja ZX Forum banner

Carburetor synchronization/synchronisation - 45 minute Do-It-Yourself

45K views 47 replies 20 participants last post by  e1_ZX-9r  
#1 · (Edited)
This should be relevant to carbureted engines with 2, 3 or 4 cylinders. EFI throttle body bikes, review your repair manual's procedure. For 2005-2006 ZX6 TB sync CLICK HERE. A highly recommended Do-It-Yourself, especially if you can borrow someone else's sync tool. It is really that easy.

My used ZX-9r ran poorly at purchase and I performed an eyeball sync* myself last year to smooth most of it out, but it still wasn't perfect. I decided to perform a real carb synchronization and purchased a Carbtune Pro 4 (58 GBP/$85 shipped) after reading good reviews.

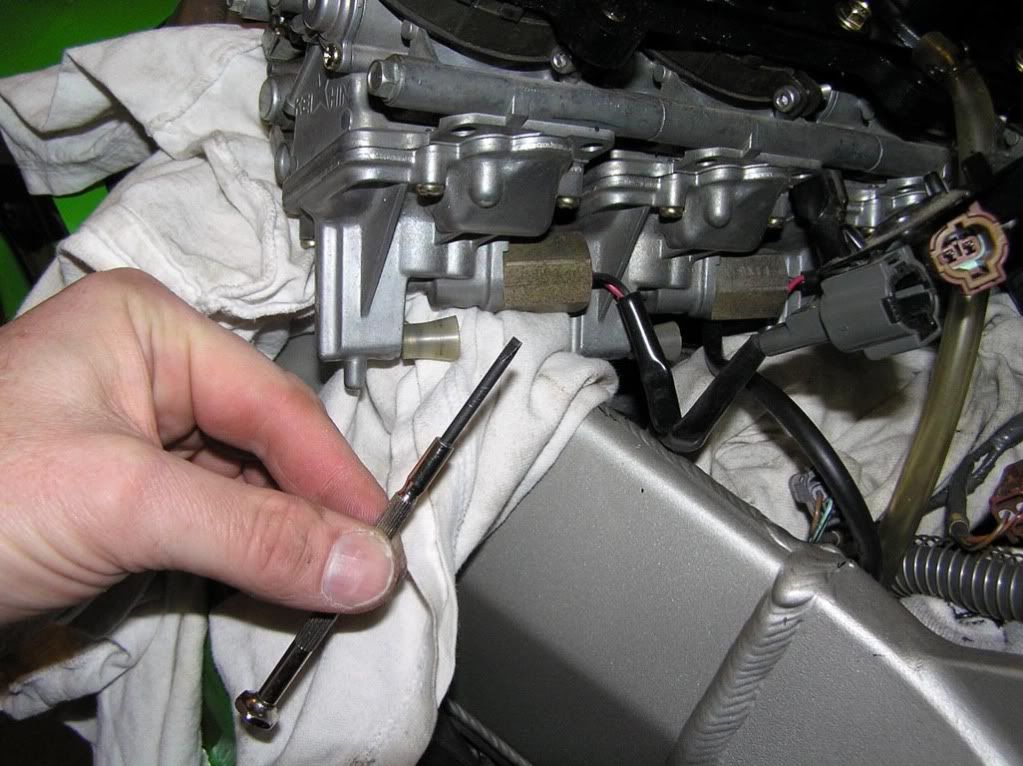
Following my Haynes repair manual, I warmed the bike up (140 degrees) raising idle to 1,500 RPM, turned it off, removed the gas tank, connected the sync vacuum tubes to their intake points (below each intake boot), started the bike, sync'ed cylinders 1&2, then 3&4, then left side to right side. That took a whole 2 minutes, so for good measure I fueled the carbs up one more time, blipped the throttle to 1,800 to reseat the butterflies and repeated. The Carbtune made this work out to be child's play.**

No more ruppity-ruppidity. She purrs like a new bike, holding right at 1,100 RPM. Throttle body synchronization theory says that the engine will start easier, run cooler, be more efficient, smoother, with better throttle response & power. :crazyloco

04/2009 1,000 mile update I had to sync her again after some 1/4 mile runs for a Youtube short vid. Dunno why. The science holds true. She runs cool & smooth, starts easy & is a joy to ride. She's very miserly for something so wickedly powerful.
Image
I only wish I would have done this 6 months ago.

*The science behind cylinder vacuum efficiency depends on many factors other than carb/EFI butterfly position; pilot air screw symmetry, pilot circuit clogs/efficiency, minor discrepancies in piston and ring fit, valve opening gap, valve air flow efficiency, carbon build up, temperature, oil weight, etc. Therefore, the only way to accurately synchronize the draw evenly is to use a tool that can measure each cylinder's efficiency.

** Before syncing carbs, always set the pilot air screws symmetrically. If you suspect the pilot air circuit may be dirty, pull the screws, clean the circuit plumbing, set them symmetrically, then perform your sync.
 
#34 ·
That would be not-sweet and non-sparkling?

Seriously though, the difference between rich and lean (high or low fuel level) in this area can be hard to describe. Both can kind of seem like a sag in power as the engine speeds up and starts to get into the main jet circuit and run cleaner. The rich version has more of a stumble or stutter i.e. wet as in clearing your throat. The lean version is more of a flat spot in the power curve and there is no stutter or bogging cough.

I would say, for grins go screw up your floats both ways and help us describe it, but it wouldn't be worth the time.
 
#35 ·
Probably not, mine seems to be more of the rich thing, which would be only a fourth indication of it.


Floats have probably never been properly set. My bike has been abused.
 
#36 ·
Probably not, mine seems to be more of the rich thing, which would be only a fourth indication of it.
Floats have probably never been properly set. My bike has been abused.
You'll definitely want to experiment with all the various settings the FP way.

As for the "dry/flat spot" concept, it is my understanding that between fuel circuits there are RPM spots where fuel delivery isn't linear. For instance, on my CVKD equipped 2002, I experimented with 14mm, where 13mm is stock: meaning 1mm leaner. I immediately noticed throttle lag, stripped the bike and put them back to 13mm.

Image


Raising fuel height with the float will help smooth out the transition from pilot (slow) jet to jet needle.
 
#37 ·
Adding some photos to help out

Eyeglass blade screwdriver used to adjust the pilot air screws symmetrically prior to the throttle body synchronization.

Tip #1: For the E* & F (2000 - 2003) models, Kawi recommends 1 5/8 turns on the pilot air screws, although 1 1/2 resulted in an increase in MPG, as well as, better hot starting. At 2.0 turns fuel consumption increased about 20% and mid-range throttle response turned lumpy. Both my 9Rs prefer 1 1/2 turns and easily eclipse 50 MPG except under the most extreme riding. (see Fuelly.com)
Image

On the E1/E2 models the airbox can remain on, since the three synchronization screws face towards the back. Noted in the picture are the clear restrictor tubes, whose job it is to even out vacuum pulses.
Image

A closer look at both the restrictor tube inserts (note #4) and the vacuum nipple locations under the intake boots (1998 - 2003, perhaps other models too).
Image

This last photograph is not necessarily relevant to performing a carb sync, but I wanted to point out various items that some of your 9Rs may or may not have.
1) Leftmost: see the electronic connectors for the float bowl fuel cut-off solenoids.
2) Bottom center: original fuel filter, at that time with 54,000 miles on it.
3) Top Center: fuel pump
4) Right of top center: California emissions plumbing (blue/blk tubing).
5) Bottom right: California emissions charcoal canister (black rectangle).​
Image

* Pictured: 2000 ZX-9R E1 California (CA) model
 
#39 ·
The manual says, "The take-off point for each cylinder is located at the base of the cylinder head intake port, directly beneath the carb intake rubber. Depending on model, the take-off port will have either a blanking bolt or an adapter fitting screwed into it." I found 2 bolts in the middle on the intake, and the two intake ports on the outside have hoses attached. My adapters that came with the manometer are not the same thread diameter as the bolts in the middle. I'm not sure where to go from here.
 
#41 ·
Aaaaaand those are drains.

I found this picture, so I believe I have found the right ports, but I'm just not sure how I can get all 4 synced at the same time.. I guess I could borrow the nipple off of 4, do 1 & 2, switch them over to 3&4, then use 2&3 to do all 4 carbs. If that's the case then I should have just bought the damn manometer with two Guages and saved myself some money
Image
 
#42 · (Edited)
Re-read that thread again. My problem is that there are no vacuum nipples on 2 & 3. I will see if I can locate some at the hardware store tomorrow to keep from having to switch them around two extra times as mentioned. My manometer didn't come with any.

Sync'd up the carbs yesterday and I got that "being pulled by a freight train" feeling back during acceleration. Here's a lil custom plumbing I did to accomodate my setup. I installed vacuum nozzles on carbs 2 & 3 (1 & 4 were connected to the KLEEN plumbing) so all four carbs have them to make my life easier without swapping nuts and nozzles all the time. That said, I needed to block-off said nozzles and rigged up this fine piece of engineering awe: (3/16" hose and T's)


and installed:


took it for a short test ride and this lil piggy cried "WE-WE-WEEEEE" all the way 'round atlanta :rofl
 
#44 ·
Others have been unsuccessful looking there, but you might get lucky. I'd look in the plumbing and irrigation isles for something in the 6mm ID range; you want the nipple to seal. You may be able to thread in a drip irrigation coupler or even a slow drip unit:

Image
Image
 
#45 ·
Yea it was my first time. I had already spent more time than I needed to when I went looking for answers. This resulted in a couple of rage posts :angry This morning I just went out there bit the bullet and borrowed the nipples for each pair of carbs I was on. Kept dropping it on the #2 carb.......... This resulted in having to remove the bottom coolant hose to retrieve it. By the time I got to the 3 & 4,I just removed the coolant hose by 3 because I couldn't be bothered with it. Also discovered that since I was only using two of the hoses that came with my needle style manometer, I could use one over the nipple as I was trying to get it screwed in to keep from dropping it as much.

Thanks for this thread e1. It finally led me to my answers. Also saw the same post on Kawiforums I believe. I was about to let you know you'd been plagiarized, then I realized it was you with a different screen name :crackup
 
#46 ·
... Also saw the same post on Kawiforums I believe. I was about to let you know you'd been plagiarized, then I realized it was you with a different screen name :crackup
??? I haven't been active over there for years and if there's a thread with my bike's pics, that ain't me.

Hope they plagiarized well enough to come to the same conclusions. :headscratch

BTW, place a shop rag under your carbs to catch things you drop. :rolleyes
 
#47 ·
No pics or anything, just this exact OP word for word, and the location was the same so I figured it was you. Yes the dates were only a few days difference
 
#48 ·
Post Carbtune Pro 4 carb sync cold start - 2002 ZX-9R F1

Sorry, no big sound, revving or any of that.

This is an example of a cold start on my F1 and how mine idles after having its throttle bodies synchronized. Engine takes a solid couple of minutes to break the 104° F mark.


And a similar video from 2011, except the E1 is already warm.


For a fun science experiment, if you have a 2.1 or 5.1 sound system (with a subwoofer), invite your family pet in while you play each video. I'm curious to how they will react.